The actual data processing steps applied, using IDRISI GIS software, are described below:
We created a raster image STRTONLY containing the streets from the STREET15 vector data layer, This image was created by using INITIAL to create a blank image called STRTONLY which was then updated using LINERAS from the STREET15 vector file to rasterize all of the streets.
Inspect the STRTONLY image using the SPEEDS palette.
Run DISTANCE from the Distance Operators portion of the Analysis menu, specifying STRTONLY as the Feature image and calling the output image STRTDIST.
Next run CONTRACT from the Reformat menu, specifying STRTDIST as the input image and STDISTAG as the output image. Contract by factors of 4 in both X and Y, and contract by Pixel Aggregation.
Run FILTER on STDISTAG from the Context Operators menu, choosing a 3 X 3 mean filter and an output image name of STDSAGFL.
Run FILTER again on STDSAGFL, choosing a 3 X 3 mean filter and an output image name of STDSAGF2.
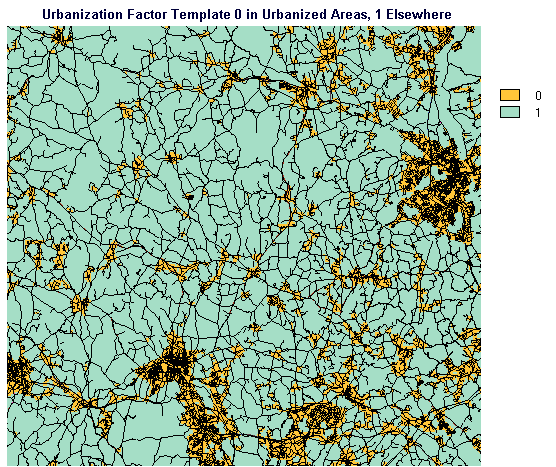
Display STDSAGF2 using the QUANT256 palette. Add the STREET15 vector layer using the default IDRLINE symbol file. Notice that the highest concentrations of streets tend to be in the darker blue areas. These are the areas we want to concentrate on and define an urbanization factor for.
Run STRETCH from the Display menu. Specify that you wish to perform a Linear stretch on the input image STDSAGF2 to produce an output image called FLTR2STR. Stretch to 256 levels (0 to 255). Specify that you wish an upper bound other than the maximum and specify a value of 400.
Run RECLASS from the Database Query section of the Analysis menu. Specify that you wish to perform a User-Defined reclass of FLTR2STR to create an output image called F2STRRCL. Specify that you wish to assign a new value of 0 to all values from 0 to just less than 50 and, - after clicking the right-pointing arrow to open a new range to specify - specify that you wish to assign a new value of 1 to all values from 50 to just less than 256.
Run EXPAND from the Reformat menu. Specify that you wish to expand the image F2STRRCL by a factor of 4 to produce URBFCT01.
At this point we have a prototype urbanization factor map but it contains values of 0 in urbanized areas and 1 in the more rural areas.
Display URBFCTO1 using the URBNFCTR palette. Add the HIWAYSPD vector line file using the QUAL256 symbol file. Add the STREET15 vector line layer using the default IDRLINE symbol file.
It would be more practical to have a factor map we could simply multiply (using the OVERLAY module) by the time-per-cell map. If we create an urbanization factor image into which we assign values of one to rural areas where time-per-cell values are not to be changed, and if we assign a value greater than 1 to urbanized areas, we can perform a multiplication overlay between this urbanization factor map and the travel-time-per-cell map to achieve the desired end.
We will now prepare the urbanization factor map. We have selected 1.4 as the retardation factor which is experienced driving through the areas we have designated as urbanized. In the original investigation from which this exercise has been abstracted, a number of different urbanization factors ranging from 1.1 to 2 were tried; 1.4 produced the greatest consistency with our ground truth.
Run EDIT from the Show File Contents portion of the File menu. Specify that you wish to edit a Values File and specify its name as FCT114. Specify real as the data type for the new values file. When you are presented with a blank text window, type a zero followed by a space and the number "1.4", then hit the enter key to move down to a new line and type a one then a space and then "1.0".
The file should look like this:
0 1.4
1 1.0
Click on Save and then Exit to leave the EDIT module.
Run ASSIGN from the Data Entry menu. Specify that you wish to use URBFCT01 as the Feature Definition Image and FCT114 as the Attribute Values File. Indicate URBFCT14 as the Output File Name.
We have just created an image, URBFCT14, in which urbanized areas have pixel values of 1.4 and rural areas (all areas aside from those we have designated as urbanized) have pixel values of 1.0. At this point, we are ready to incorporate our Urbanization Factor Map into the analysis.
Run OVERLAY from the Database Query option of the Analysis menu. For the First Image, specify TIMEPRCL, for the second image specify URBFCT14. Indicate that you wish to multiply the images together (multiplication is indicated by an asterisk (*)) to create an output image PERCLF14.
We are now ready to create our new travel time map which incorporates an urbanization factor. Run COST from the Distance Operator part of the Analysis menu. Specify that you wish to run Cost Push using HOSPWB as the Feature Definition Image and PERCLF14 as the Friction Surface Image. Indicate TTWBF14 as the output image. TTWBF14 is our new map of travel time to hospitals (with Burbank Hospital present) incorporating the urbanization factor based on street density. The next step is to check the results of our new model against the measured travel times, our ground truth.
Run EXTRACT from the Database Query portion of the Analysis menu. Specify CHECKPTS as the Feature Definition Image and TTWBF14 as the Image To Be Processed. Specify that you would like a Values File as output and name it CHKWB14.
Run DATABASE WORKSHOP from the Data Entry menu. Open the CHECKPTS database. From the Modify menu choose to add a real field called TTWBF14.
From the File menu choose to Import/Export an Idrisi Values File. Specify that the file is a Free Format ASCII (.VAL) file. Choose to Import. Select IDR_ID as the Feature Identifier Field. Enter the name of the values file as TTWBF14 and select TTWBF14 as the field to receive the data values.
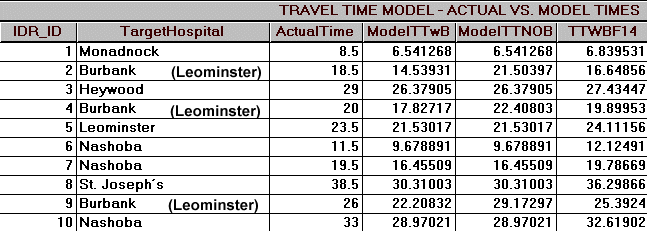
Upon inspection, it appears that the travel-time values in the field TTWBF14 agree more closely with the measured values in the ActualTime field than do the previous model predictions in the ModelTTwB field. We can verify this by running REGRESS again from the Statistics section of the Analysis menu. Specify that you wish to regress two values files and indicate MEASURED as the Independent Variable and TTWBF14 as the Dependent Variable. REGRESS calculates that we have a new r-value of 0.9936 and a Coefficient of Determination of 98.72%.
We have observed that by deriving and integrating an urbanization factor into the analysis we have improved the agreement between our ground truth - measured travel time values - and the travel time model predictions. Depending on time constraints, economic constraints, amount of measured travel time data available, etc., it would be possible to improve this analysis further by refining and improving upon methods and assumptions employed in this exercise.
One final step is necessary in this portion of the exercise - we need to create a travel time map using the same travel-time-per-cell image for the case where Burbank Hospital is absent.
Run COST (cost push) again and specify HOSPNOB as the Feature Definition Image and PERCLF14 (the travel-time-per-cell-with-urbanization-factor-of-1.4 image) as the Friction Surface Image. Call the Output Image TTNOBF14. TTNOBF14 is the travel time map, incorporating the urbanization factor, for the scenario where Burbank Hospital has been closed.
Now, with our improved travel-time data layers in hand, we continued our analysis, looking at the numbers and distributions of residents potentially affected by Burbank Hospital closure.
Rejoin the main study